So you've got a Raspberry Pi Pico lying around and you're thinking, "Can this tiny board actually track stuff in real time?" The short answer: yes. Toss in a GPS module, a GSM module, and a bit of patience, and you can build your very own IoT GPS tracker that beams live location data to the cloud.
It's surprisingly doable. The magic combo here is a Raspberry Pi Pico, a SIM800L GSM module, and the good old Neo-6M GPS module.
What You'll Need
- Raspberry Pi Pico (or Pico W)
- SIM800L GSM module
- Neo-6M GPS module
- GPS antenna
- GSM antenna
- A handful of LEDs (red, yellow, green)
- A 2G SIM card (yep, 2G still lives)
- Jumper wires, breadboard
- Power supply or LiPo battery
Heads up: the SIM800L is picky about power. It needs a clean 3.7–4.2V and can sip up to 2A at times. If your module doesn't already have a regulator, don't just feed it 5V from Pico. Use a LiPo or a buck converter.
How This Tracker Actually Works
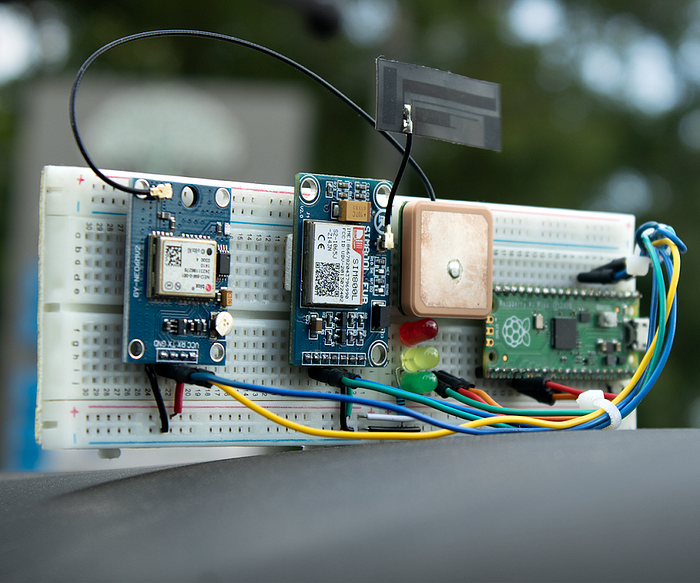
The Pico sits at the center, acting like a traffic cop. The Neo-6M GPS spits out location data (latitude, longitude, time, etc.). The Pico catches that and forwards it to the SIM800L, which beams it up to the cloud over a regular GSM connection using HTTP requests.
All that data ends up on Circuit Digest's GeoLinker API, which is basically a cloud service that stores your GPS points and lets you see them on a map. Log in, and you can watch your tracker's movements in real time.
Now here's the clever bit. If the GSM module loses network for a while (because you're in the woods or your basement workshop), the Pico just stashes the data locally. As soon as the network comes back, it uploads the backlog first, then continues with live updates. No gaps in your tracking.
The Modules in Play
SIM800L GSM/GPRS Module
This little guy is the "phone" part of your tracker. It can send SMS, make calls, and, more importantly, use GPRS to send data. It works on 2G bands (850/900/1800/1900 MHz), which are still around in many places. You control it with simple AT commands like AT+CSQ for signal or AT+HTTPACTION for pushing data.
Just remember:
- Needs 3.7–4.2V power and can spike to 2A.
- Always give it a decent GSM antenna.
- Logic levels hover around 2.8–3V, but it usually tolerates 3.3V from Pico pins.
Neo-6M GPS Module
This one's your satellite whisperer. It locks onto GPS satellites and sends out NMEA sentences like $GPGGA and $GPRMC, which include latitude, longitude, altitude, and more.
Good stuff to know:
- Runs at 3.3V, draws ~50mA.
- Gets a fix in as little as 1 second (if warm-started).
- Accuracy is about 2.5 meters on a good day.
- Works best with an external active GPS antenna.
Circuit and Wiring
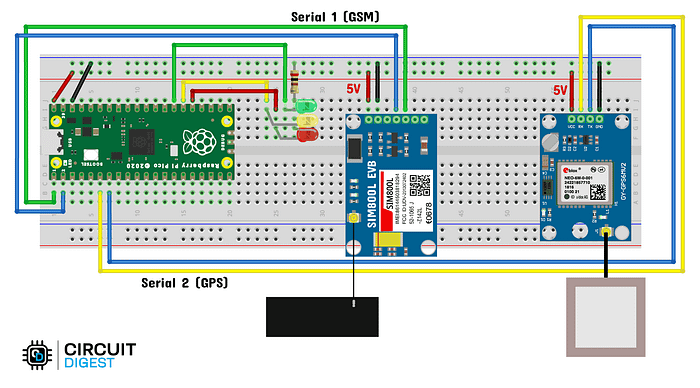
You'll wire up the SIM800L to one of Pico's UARTs and the Neo-6M to another. Ground is shared, and power comes from a regulated source. It's mostly just TX/RX swaps: Pico RX goes to module TX, Pico TX to module RX.
Tip: If your modules have onboard regulators (LDO), you can actually feed them 5V directly from Pico's VBUS.
Software Side: GeoLinker API
Circuit Digest Cloud provides the GeoLinker API, which is what we're using to send GPS points to the cloud and see them on a live map.
You'll need to:
- Sign up at circuitdigest.cloud.
- Generate an API key from your account.
- Drop that key into your Arduino sketch.
That's it. Once the Pico pushes coordinates through SIM800L, you'll see them plotted in your account dashboard.
Setting Up Pico on Arduino IDE
- Open Arduino IDE and add the RP2040 board support URL:
https://github.com/earlephilhower/arduinopico/releases/download/global/package_rp2040_index.json - Then install "Raspberry Pi Pico / RP2040 by Earle Philhower".
- Open Library Manager, search for GeoLinker, and install it.
- Restart IDE (yes, always restart) and you'll see ready-to-go examples under
File > Examples > GeoLinker.
Code Snippet
Complete code is available in this GitHub Repository: https://github.com/Circuit-Digest/Interfacing-SIM800L-and-Neo-6M-GPS-Modules-with-Raspberry-Pi-Pico-and-Pico-W-Using-GeoLinker
#include <GeoLinker.h>

// --- GPS SERIAL CONFIGURATION ---
#define gpsSerial Serial2
#define GPS_RX 4
#define GPS_TX 5
#define GPS_BAUD 9600

// --- GSM SERIAL CONFIGURATION ---
#define gsmSerial Serial1
#define GSM_RX 0
#define GSM_TX 1
#define GSM_BAUD 9600

// --- LED INDICATORS ---
#define LED_GREEN 21   // Success
#define LED_YELLOW 20  // GPS error
#define LED_RED 19     // GSM error

// --- GEO LINKER CONFIGURATION ---
const char* apn = "gprs";
const char* apiKey = "xxxxxxx";        // Your API key
const char* deviceID = "tracker_test"; // Unique device ID
const uint16_t updateInterval = 3;     // Update every 3s

GeoLinker geo;

void setup() {
  Serial.begin(115200);
  delay(1000);

  // GPS UART
  gpsSerial.setTX(GPS_RX);
  gpsSerial.setRX(GPS_TX);
  gpsSerial.begin(GPS_BAUD);

  // GSM UART
  gsmSerial.setTX(GSM_RX);
  gsmSerial.setRX(GSM_TX);
  gsmSerial.begin(GSM_BAUD);

  // LEDs
  pinMode(LED_GREEN, OUTPUT);
  pinMode(LED_YELLOW, OUTPUT);
  pinMode(LED_RED, OUTPUT);

  // GeoLinker Init
  geo.begin(gpsSerial);
  geo.setApiKey(apiKey);
  geo.setDeviceID(deviceID);
  geo.setUpdateInterval_seconds(updateInterval);
  geo.setNetworkMode(GEOLINKER_CELLULAR);
  geo.setModemCredentials(apn, nullptr, nullptr);
  geo.beginModem(gsmSerial);

  Serial.println("GeoLinker setup complete.");
}

void loop() {
  geo.setPayloads({ {"temperature", 27.5}, {"humidity", 65.3} });
  geo.setBatteryLevel(90);

  uint8_t status = geo.loop();

  if (status == STATUS_SENT) {
    digitalWrite(LED_GREEN, HIGH);
    delay(500);
    digitalWrite(LED_GREEN, LOW);
  }
}
Troubleshooting
- GeoLinker examples missing? Restart the IDE, check the library folder name, and confirm your board is set to "Raspberry Pi Pico / RP2040."
- SIM800L keeps crashing? Double-check your power supply. It probably can't handle the 2A spikes.
- No GPS fix? Get outside with a clear view of the sky and wait a minute. Indoors, it'll struggle.
Testing It Out
Upload the sketch, pop in your SIM card, and power it up. If all goes well, you'll see the tracker start posting coordinates. Log in toCircuit Digest Cloud, and watch your path draw itself on the map in real time.
Congratulations …you just built your own Raspberry Pi Pico GPS Tracker