If you've ever developed a real multimodal AI application, you already understand the challenge: Too many systems. Too much glue code. Too much duct tape.
You need a vector database for embeddings. A SQL database for metadata. An S3 bucket for large files. A separate pipeline for chunking. Another script for inference. And then some agent framework on top of all that.
Pixeltable is the first open-source Python library that states: "Stop. Put everything in one place."
And honestly? It works shockingly well.
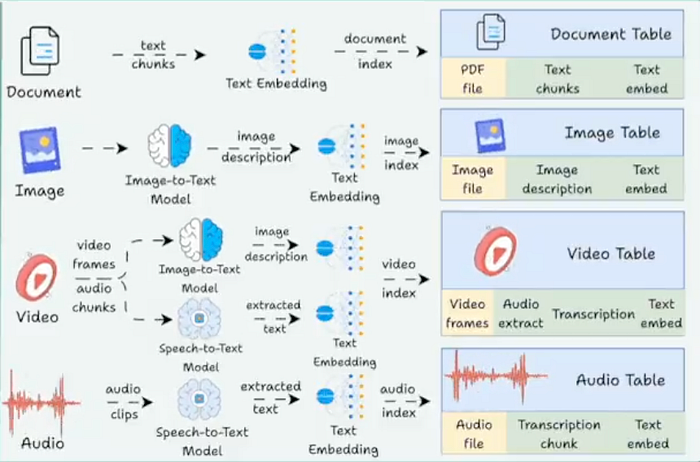
Pixeltable provides a unified, declarative interface where documents, embeddings, images, videos, LLM outputs, chunked text, conversation history, tool calls — everything — appears as a table. These tables can automatically perform calculations whenever your data updates.
Let's break it down the simple way.
Why Pixeltable Exists
AI apps today are messy. You deal with:
- SQL for structured data
- A vector DB for embeddings
- File storage for images/videos
- Cron jobs or Airflow for pipelines
- Python scripts are scattered everywhere
- API wrappers for OpenAI, HuggingFace, Anthropic
Pixeltable basically says: What if the table itself handled the entire pipeline?
And that's precisely what happens:
- Insert new data — embeddings are computed automatically
- Modify code — only changed rows recompute
- Store images, videos, audio, PDFs → all handled
- Run LLMs, vision models, custom UDFs → directly in the table
- Search — vector + SQL filters at the same time
- Undo mistakes — built-in versioning + time travel
- Export — Parquet, LanceDB, COCO, PyTorch Datasets
You focus on logic. Pixeltable handles the plumbing.
Getting Started in 10 Seconds
pip install pixeltableThat's it.
Let's create your first multimodal table.
import pixeltable as pxt

# A table with an image column
t = pxt.create_table('images', {'input_image': pxt.Image})
Now add a computed column — something that executes automatically.
Pixeltable offers ready-to-use integrations with Hugging Face:
from pixeltable.functions import huggingface

t.add_computed_column(
    detections=huggingface.detr_for_object_detection(
        t.input_image,
        model_id='facebook/detr-resnet-50'
    )
)
And you can extract fields like you're working with SQL:
t.add_computed_column(
    detections_text=t.detections.label_text
)
Add OpenAI Vision too:
from pixeltable.functions import openai

t.add_computed_column(
    vision=openai.vision(
        model='gpt-4o-mini',
        prompt="Describe what's in this image.",
        image=t.input_image
    )
)
Insert image — all computations run automatically:
t.insert({'input_image': 'https://raw.github.com/pixeltable/.../000000000025.jpg'})Query everything:
results = t.select(
    t.input_image,
    t.detections_text,
    t.vision
).collect()
Boom. That's ingestion — detection — LLM — query… all in one system.
What Actually Happened Behind the Scenes?
Pixeltable quietly handled everything for you:
Data ingestion
Images, audio, videos, PDFs — all stored locally and referenced automatically.
Computation
Your computed columns run only when needed.
Model integration
OpenAI, HuggingFace, CLIP, YOLOX — all built in.
Vector search
Embedding indexes live inside the table. No extra DB.
Versioning
Tables have full change history and time-travel querying.
Caching
Recomputes only data affected by code changes → saves time and money.
No pipeline scripts. No Frankenstein architecture. Just Python with declarative logic.
Example 1: A Simple Table With Automatic Computations
Let's start simple — movies and profits.
import pixeltable as pxt

t = pxt.create_table(
    'films',
    {'name': pxt.String, 'revenue': pxt.Float, 'budget': pxt.Float},
    if_exists="replace"
)
t.insert([
    {'name': 'Inside Out', 'revenue': 800.5, 'budget': 200.0},
    {'name': 'Toy Story', 'revenue': 1073.4, 'budget': 200.0}
])
# Computed column
t.add_computed_column(
    profit=(t.revenue - t.budget),
    if_exists="replace"
)
print(t.select(t.name, t.profit).collect())
You never wrote a loop. Pixeltable automatically calculated each row.
Example 2: Object Detection With YOLOX
Want YOLOX? Just write a normal Python function.
@pxt.udf
def detect(image):
    model = Yolox.from_pretrained("yolox_s")
    result = model([image])
    return [COCO_CLASSES[label] for label in result[0]["labels"]]
Register the column:
t.add_computed_column(classification=detect(t.image))Pixeltable handles batching, model reuse, and storage.
Example 3: Image Similarity Search Using CLIP
Create a table:
images = pxt.create_table('my_images', {'img': pxt.Image}, if_exists='replace')Add embeddings:
from pixeltable.functions.huggingface import clip

images.add_embedding_index(
    'img',
    embedding=clip.using(model_id='openai/clip-vit-base-patch32')
)
Search with text:
sim = images.img.similarity("a dog playing fetch")

results = images.order_by(sim, asc=False).limit(3).collect()
Search with an image URL:
sim2 = images.img.similarity(query_image_url)Same interface — different modalities.
Example 4: A RAG pipeline with chunking, embeddings, and LLMs
You can create a complete RAG system without using LangChain or a vector database.
Step 1: Store your documents
docs = pxt.create_table('my_docs.docs', {'doc': pxt.Document})
docs.insert([{'doc': 'https://.../Jefferson-Amazon.pdf'}])
Step 2: Split into chunks
chunks = pxt.create_view(
    'doc_chunks',
    docs,
    iterator=DocumentSplitter.create(document=docs.doc, separators='sentence')
)
Step 3: Add embedding index
embed = huggingface.sentence_transformer.using(model_id='all-MiniLM-L6-v2')
chunks.add_embedding_index('text', string_embed=embed)
Step 4: Define a retrieval function
@pxt.query
def get_relevant_context(query, limit=3):
    sim = chunks.text.similarity(query)
    return chunks.order_by(sim, asc=False).limit(limit).select(chunks.text)
Step 5: Build a Q&A table
qa = pxt.create_table('my_docs.qa_system', {'prompt': pxt.String})Add context → format prompt → get answer:
qa.add_computed_column(context=get_relevant_context(qa.prompt))

qa.add_computed_column(
    final_prompt=pxtf.string.format(
        "PASSAGES:\n{0}\nQUESTION:\n{1}",
        qa.context,
        qa.prompt
    )
)
qa.add_computed_column(
    answer=openai.chat_completions(
        model='gpt-4o-mini',
        messages=[{'role': 'user', 'content': qa.final_prompt}]
    ).choices[0].message.content
)
Ask a question:
qa.insert([{'prompt': 'What can you tell me about Amazon?'}])Done. A full RAG pipeline in ~30 lines.
Why Pixeltable Matters
We're moving towards a future where multimodal apps aren't just "cool experiments" — they become the norm.
But the infrastructure hasn't caught up. Everyone is still connecting too many tools.
Pixeltable's main contribution isn't a new model or algorithm. It's a new level of abstraction.
"Everything is a table."
Images. Embeddings. Videos. Metadata. LLM outputs. Chunks. Tool calls.
Once everything lives in a table, the entire workflow becomes:
- declarative
- incremental
- reproducible
- searchable
- versioned
- unified
This is how modern AI infrastructure should feel.
Final Thoughts
If you've ever attempted to ship a real AI application, Pixeltable is one of those rare open-source tools that instantly clicks.
"Oh… this removes half my architecture."
You can use it for:
- RAG systems
- multimodal analytics
- image/video pipelines
- agent workflows
- custom data processing
- dataset preparation
- embeddings + search
- and honestly, anything touching multimodal data
If context engineering is becoming the new "backend," Pixeltable seems to be the first framework designed for it.