Apple loves to tell you that privacy is an iPhone feature. They put it on billboards. They make entire ad campaigns about it. And compared to the alternatives, they're mostly right. If I had to choose between handing my data to Apple or handing it to Google, I'd pick Apple every time.
But "better than Android" is a remarkably low bar when it comes to privacy. And there are still dozens of settings on your iPhone that are quietly sharing your data in ways you almost certainly didn't explicitly agree to.
I recently went through every single privacy and security setting on my iPhone. Some of the defaults genuinely surprised me, and I've been writing about Apple products for nearly a decade. What I found isn't a conspiracy. It's a $300 billion data broker industry that exists because most people never open Privacy & Security in their Settings app.
This post is the result of that audit. Every setting worth changing, ranked by how much it actually matters, with honest explanations of what each one does and what (if anything) you give up by turning it off. I'm not going to tell you to throw your phone in the ocean. I'm going to give you the information so you can decide for yourself what you're comfortable with.
The Settings That Matter Most (Start Here)
1. App Tracking Transparency
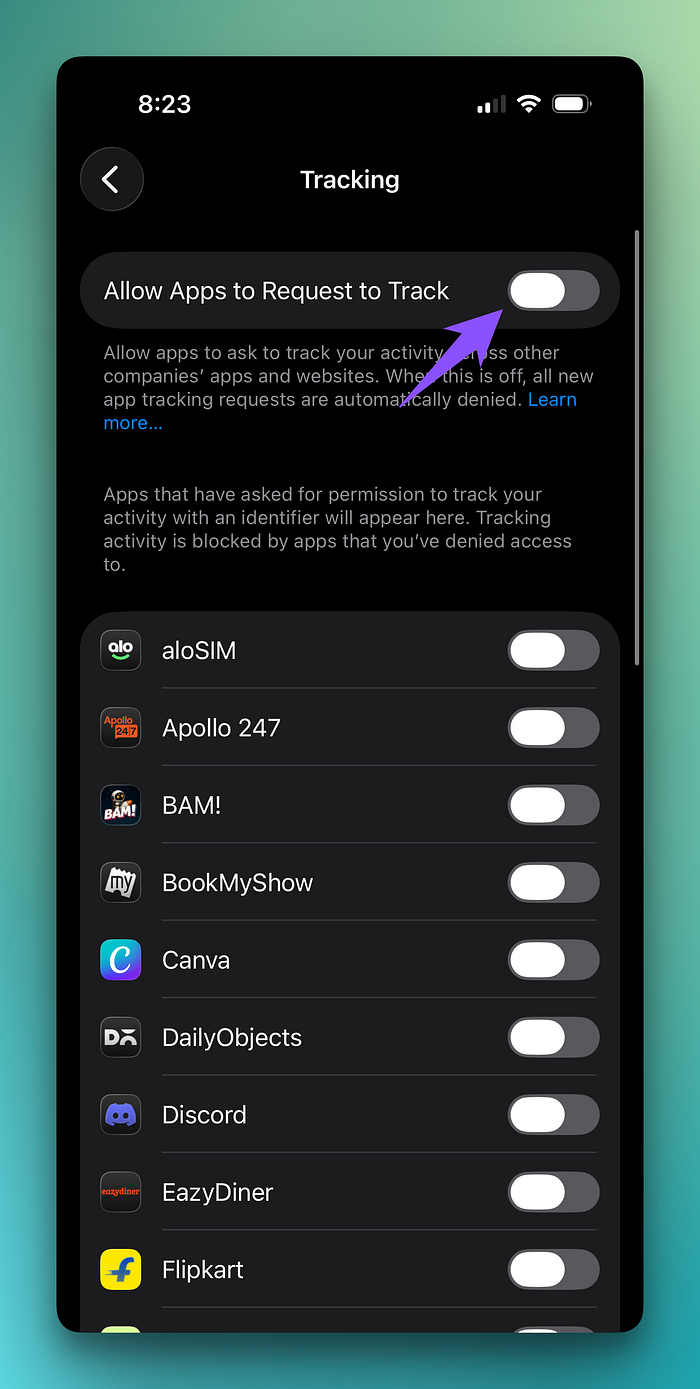
Settings > Privacy & Security > Tracking > Allow Apps to Request to Track: turn OFF.
When this is on, apps can track your activity across other apps and websites to build a detailed advertising profile about you. What you search for, what apps and websites you open, what you buy. All of it gets sold to advertisers so they can show you specific ads.
When you turn this off, apps can't even ask for permission to track you. They're blocked by default.
When Apple introduced this feature, Meta reportedly lost over $10 billion in ad revenue in the first year. If a company is spending that much money fighting a single toggle on your iPhone, that toggle is doing something very right for your privacy.
You'll still see ads, but they won't be personalized based on a surveillance profile of your digital life.
2. Location Services: The Full Audit
Settings > Privacy & Security > Location Services.
Three things to check here:
Apps set to "Always." Scroll through your list and look for any app that says "Always." An app with 'Always' access to your location is essentially a permanent tracker. Unless it's something that needs constant location access, switch it to "While Using" or "Never."
Precise Location. Tap on any app in your Location Services list, and you'll see a toggle called Precise Location.
When Precise Location is on, the app knows where you are within about a 10-foot circle. When it's off, the app only knows you're somewhere within a roughly 1-kilometer area. Turn off Precise Location for every app except Maps and ride-sharing apps.

System Services (the hidden menu). Scroll all the way to the bottom of Location Services and tap System Services.
Here's what I recommend:
Turn off everything under Product Improvement. These send your location data to Apple to help them improve their services. That's nice of you, but Apple is a 3-trillion-dollar company. They can improve their own products.
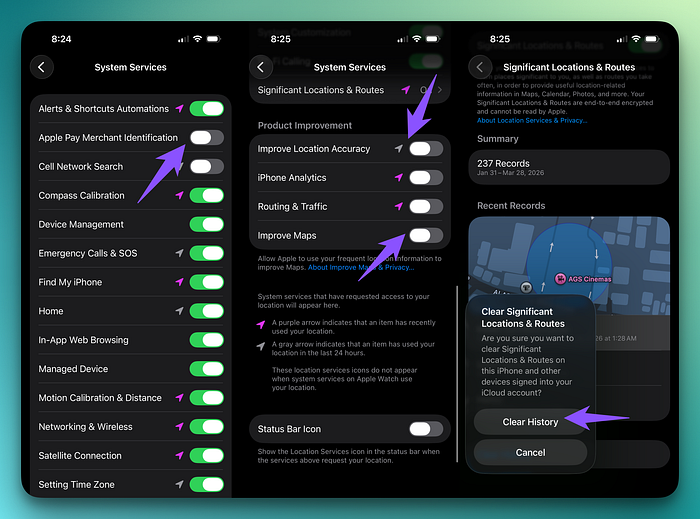
Turn off Significant Locations and Routes. Tap into it, turn it off, and tap Clear History. This feature tracks everywhere you go to build a complete profile of your life. Apple says it helps with things like travel time estimates and restaurant suggestions. I say that's not a good enough reason for my phone to maintain a detailed log of every place I've ever been.
Turn off Cell Network Search (just helps Apple build their cell tower database), Apple Pay Merchant Identification (makes merchant names look prettier in your transaction history), and Sharing Framework.
Leave on Emergency Calls and SOS, Find My iPhone, Compass Calibration, and Networking and Wireless.
And at the bottom of System Services, turn ON the Status Bar Icon. This makes your iPhone show the location arrow in the status bar every time any service accesses your location. It's basically a transparency toggle that makes your phone be honest with you about when it's tracking you.
3. Analytics and Improvements
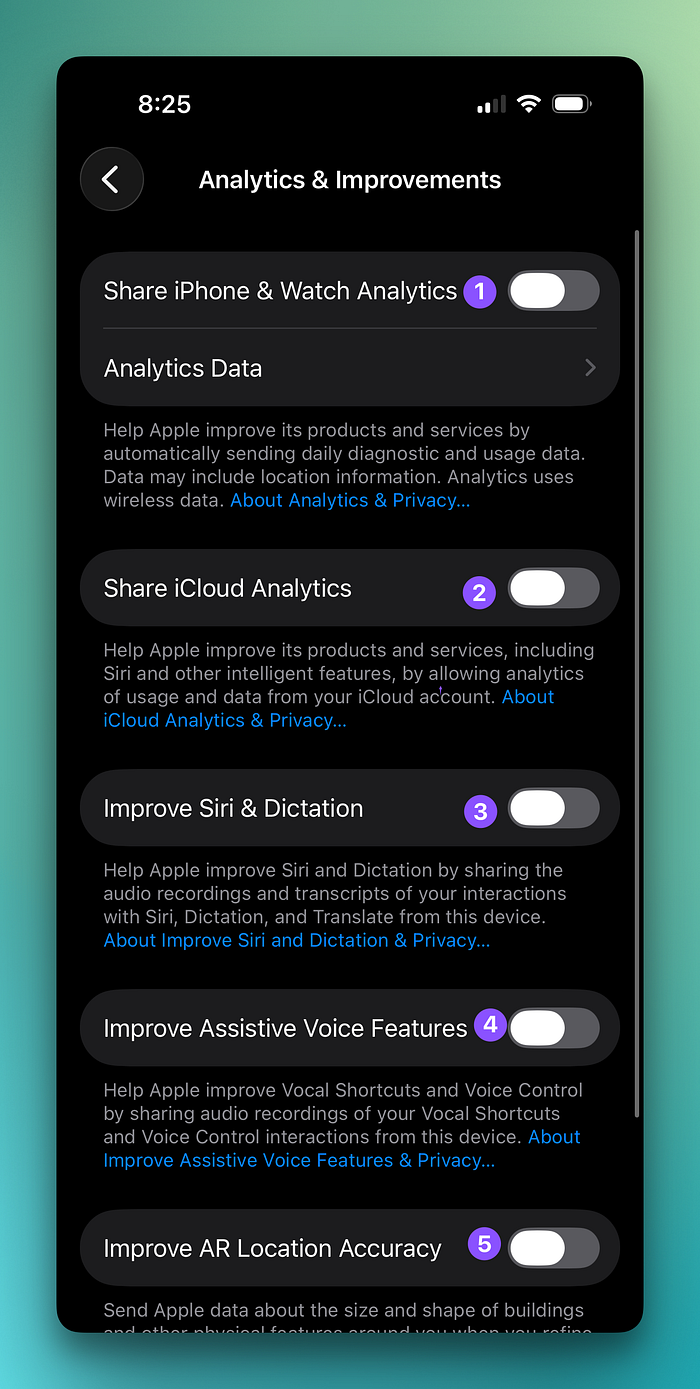
Settings > Privacy & Security > Analytics & Improvements.
Every toggle on this page sends usage data to Apple or third-party app developers. The list has grown considerably over the years, and at this point it's almost comically long: iPhone Analytics, iCloud Analytics, Share with App Developers, Improve Siri and Dictation, etc.
Turn off everything on this page. Your phone will work exactly the same way. You're just opting out of being an unpaid research participant for the world's most valuable company.
Bonus: you'll get a tiny battery improvement because your phone is no longer collecting, processing, and uploading all this data in the background. It's not a dramatic difference, but it's not nothing either.
4. Apple Advertising
Settings > Privacy & Security > Apple Advertising > Personalized Ads: turn OFF.
Most people think of targeted advertising as a Google and Facebook problem. Apple also runs its own advertising system inside the App Store, Apple News, and the Stocks app. By default, they track your app activity (what you download, what you search for, what you read) to personalize those ads.
Apple got fined €8 million by France for doing this without getting clear consent. They've since improved their approach in some regions, but if you never explicitly opted out, the setting is probably still on.
Protecting Your Photos and Camera
5. Location Data in Photos
Every photo you take on your iPhone embeds GPS coordinates by default. That means if you share a photo of your living room, you're potentially sharing your home address. The photo looks innocent. The metadata is anything but.
You have two options:
Per-share basis: When sharing a photo, tap Options at the top of the share sheet. You'll see a toggle for Location. Turn it off, and the photo gets shared without coordinates. The downside is that you have to remember to do this every time.
Disable entirely: Settings > Privacy & Security > Location Services > Camera > set to Never. No photo you take will ever contain your location again. You lose the ability to see your photos on a map in the Photos app, which is admittedly a nice feature, but it's a trade-off worth considering.
6. Live Photos: The Privacy Risk Nobody Talks About
Live Photos record a few seconds of video and audio before and after you tap the shutter button. Most people think of this as a fun feature that makes photos move slightly. It's also a privacy feature that records ambient audio and visual context that you may not realize is being captured.
There have been real stories of people sharing Live Photos and accidentally including background audio of private conversations or video of things happening just off-frame that they didn't want shared.
Turn off Live Photos in the Camera app by tapping the concentric circles icon until it shows "Live Off." Then go to Settings > Camera > Preserve Settings and toggle on Live Photo. This preserves your "off" setting so the Camera doesn't helpfully reset it to "on" every time you reopen the app.
Security Settings Most People Ignore
7. Stolen Device Protection
Settings > Privacy & Security > Stolen Device Protection: turn ON, set to Always.
Let's say someone watches you type your passcode in a crowded bar. They steal your phone. With just your passcode, they can change your Apple ID password, set up a new security key, and permanently lock you out of your own iCloud account. Your photos, your messages, your passwords, your entire digital life. Gone.
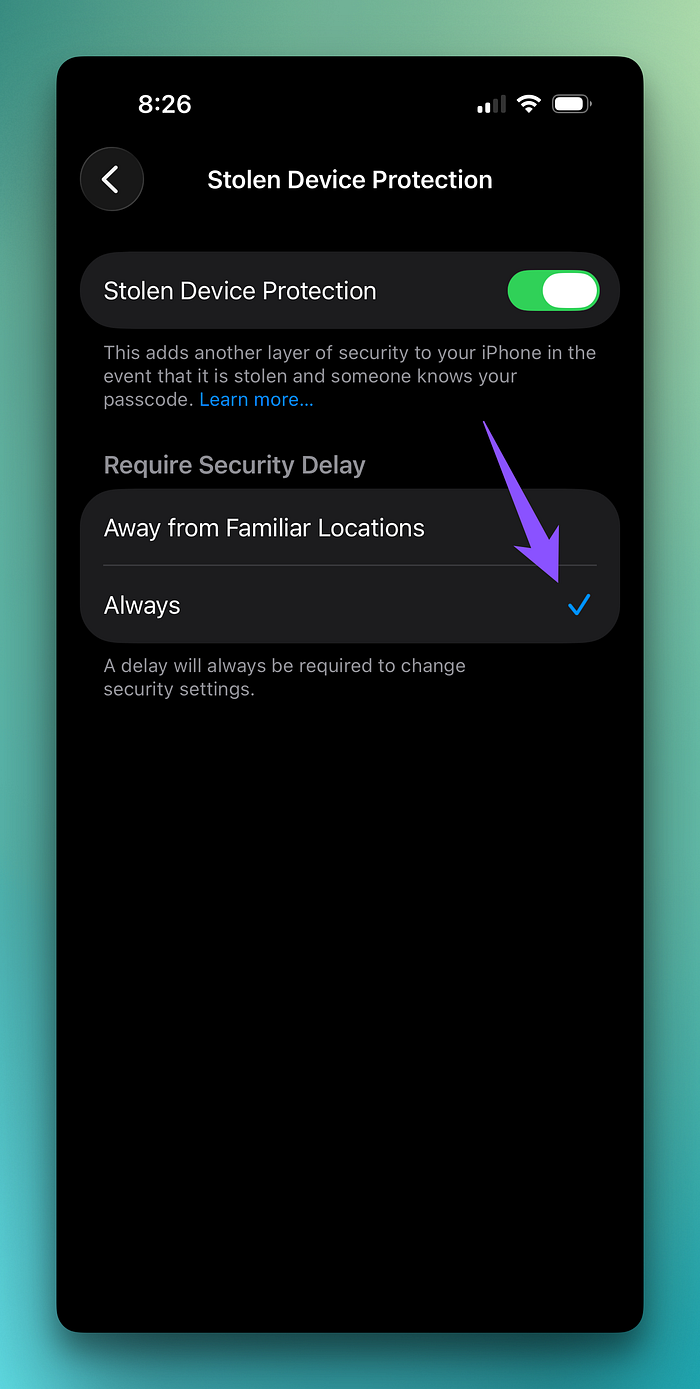
Stolen Device Protection adds a one-hour delay for critical account changes and requires biometric authentication instead of just the passcode. A thief would need to hold your phone up to your face, wait an hour, find you again, and do it a second time.
Set it to "Always" instead of "Away from familiar locations." Apple doesn't tell you what your "familiar locations" are, you can't see or edit them, and if a thief steals your phone at a coffee shop you visit frequently, it might be classified as familiar. Just set it to Always and eliminate the ambiguity.
8. What's Accessible on Your Lock Screen
Settings > Face ID & Passcode > Allow Access When Locked.
This section controls what people can do with your phone without unlocking it. Review each toggle:
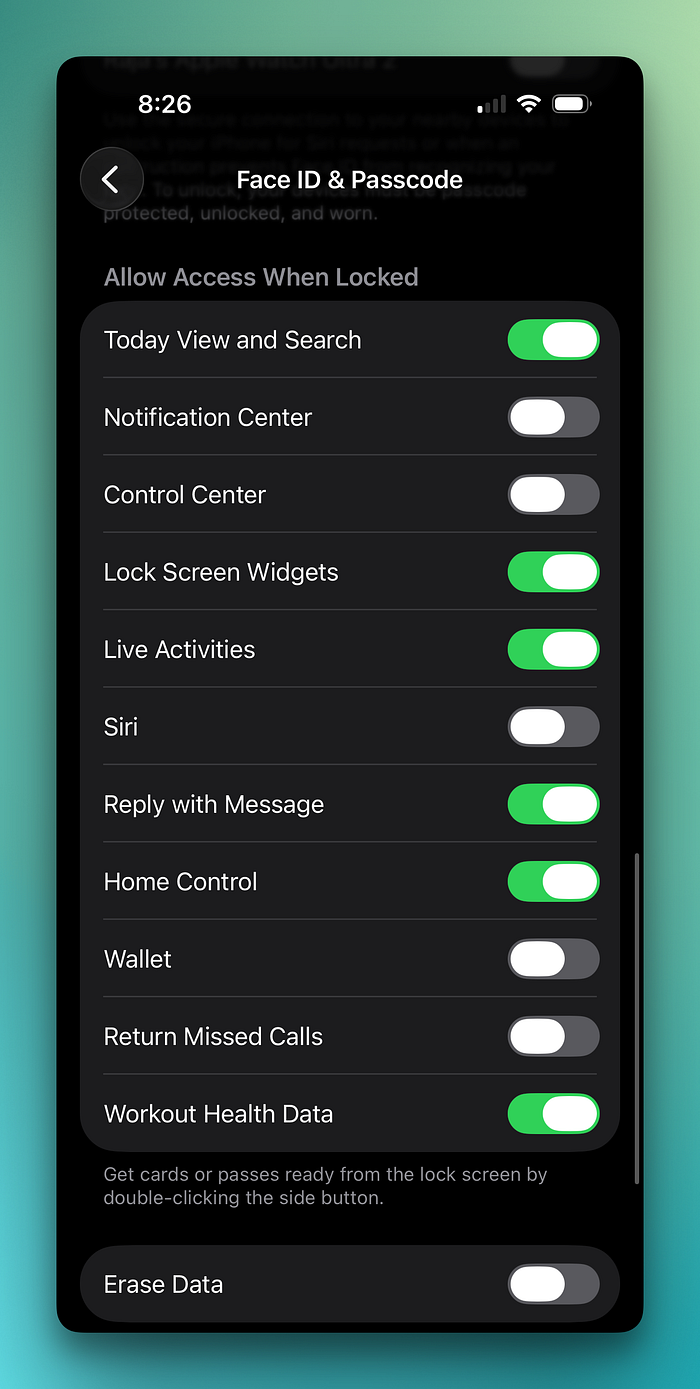
Control Center: turn OFF. If a thief steals your phone, the first thing they do is enable Airplane Mode to prevent you from tracking it. They do this by swiping down on the lock screen to access Control Center. If you disable Control Center access when locked, they can't do this.
Siri: turn OFF. Siri can do a surprising amount without your phone being unlocked. Better to require Face ID first.
Reply with Message and Return Missed Calls: turn OFF. Prevents unauthorized communication from your locked phone.
Wallet: turn OFF. With Wallet accessible from the lock screen, anyone can double-click the side button and see what cards you have saved. You still need Face ID to actually pay, so disabling lock screen access costs you zero convenience while removing the ability for strangers to browse your financial information.
Home Control: turn OFF. Unless you want someone to potentially unlock your smart locks from your locked phone.
9. Use an Alphanumeric Passcode
Settings > Face ID & Passcode > Change Passcode > Passcode Options > Custom Alphanumeric Code.
A 4-digit passcode can be shoulder-surfed in a second. A 6-digit numeric passcode is better but still observable. An alphanumeric passcode (letters, numbers, and symbols) is dramatically harder for someone to watch you type and remember.
The objection I always hear is "that sounds really inconvenient." It's not. You rarely type your passcode because Face ID handles everything. It only comes up for certain security-sensitive settings, when Face ID fails multiple times, or roughly once a week if you haven't typed it in a while. For those rare occasions, the 5 seconds it takes to type a short phrase is worth the security improvement.
10. Wired Accessories
Settings > Privacy & Security > Wired Accessories: set to "Ask for New Accessories."
This protects against juice-jacking: plugging your phone into what you think is a public USB charger that's actually a malicious device designed to access your data. When this setting is enabled, your iPhone won't trust a new USB connection until you explicitly approve it.
11. Find My: Send Last Location
Settings > [Your Name] > Find My > Find My iPhone > Send Last Location: turn ON.
If your phone's battery is critically low, it sends one final location ping before dying. Without this, if your phone dies before you realize it's missing, Find My won't have a recent location to show you. With it enabled, you at least know where it was when the battery gave out.
Apple Intelligence and Siri
12. Apple Intelligence Privacy Controls
Settings > Apple Intelligence & Siri.
Apple Intelligence was enabled by default in recent updates, and the main privacy concern is its connection to ChatGPT. When Siri connects to ChatGPT, your data can be sent to OpenAI's servers. Apple says they use privacy safeguards, and they do, but the data is still leaving your device.
You have options ranging from gentle to nuclear:
Nuclear: Turn off Apple Intelligence entirely at the top of this settings page. Everything goes away.
Moderate: Scroll down to ChatGPT under Extensions and toggle off Use ChatGPT. You keep Apple Intelligence features but sever the connection to OpenAI.
Surgical: Settings > Screen Time > Content and Privacy Restrictions > Intelligence and Siri. Here you can disable image creation, writing tools, or ChatGPT individually. This is the approach I use. I keep the features I find useful and disable the ones I don't need.
I use Apple Intelligence features regularly and find them genuinely helpful for my content work. But I understand why some readers would want to limit what data leaves their device, and you should have the information to make that choice for yourself.
13. Siri Voice Activation
Settings > Apple Intelligence & Siri > Talk and Type to Siri.
"Hey Siri" means the microphone and a small processor core are always listening for the wake phrase. Apple processes this locally on the device (it's not sending audio to the cloud constantly), but if you never use voice activation and always use the side button to trigger Siri, there's no reason to keep this on.
I turned mine off months ago. I activate Siri by holding the side button maybe twice a week. The always-listening mode was doing nothing for me except using a tiny amount of battery.
Safari and Web Browsing
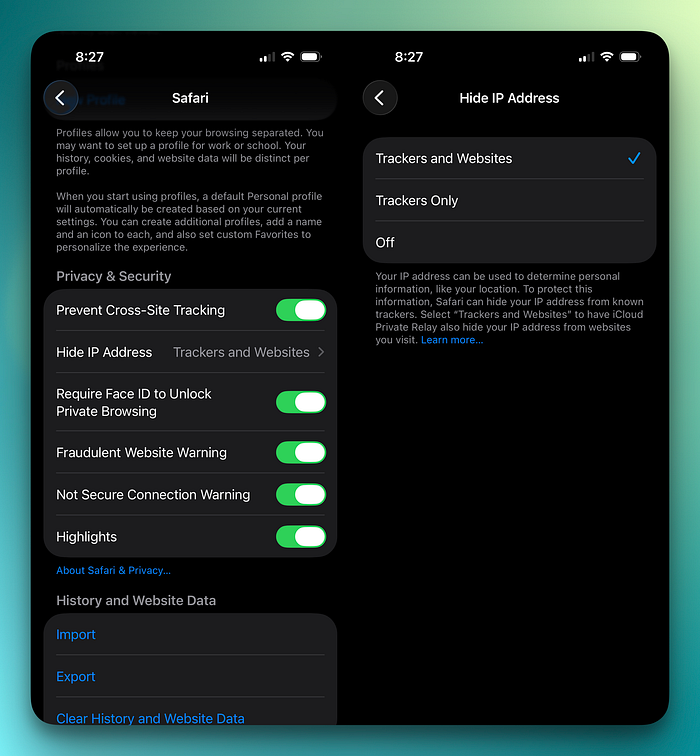
14. Prevent Cross-Site Tracking
Settings > Apps > Safari > Privacy & Security > Prevent Cross-Site Tracking: turn ON.
Without this, when you browse TVs on Best Buy's website, Best Buy can share that information with Facebook, and suddenly your Facebook feed is full of TV ads. Cross-site tracking is how companies follow you around the internet, and this toggle stops it.
15. Hide IP Address
Same section > Hide IP Address > set to "From Trackers."
Hiding your IP address from trackers makes it harder for advertisers to identify and follow you across the web.
16. Safari Preload Top Hit: Turn Off
Settings > Apps > Safari > Preload Top Hit: turn OFF.
When you start typing a search, Safari preloads the top result in the background before you even tap on it. This uses data, drains battery, and shares your browsing intent with a website you haven't chosen to visit.
17. Fraudulent Website Warning: Turn On
While you're in Safari settings, make sure Fraudulent Website Warning is enabled. This alerts you if you're about to visit a known scam site.
18. Clear Website Data Periodically
Settings > Apps > Safari > Advanced > Website Data > Remove All Website Data.
Good housekeeping. Clears cookies and cached data from websites you've visited. Do this every few weeks. It takes two taps and about three seconds.
The Bottom Line
You don't need to be paranoid to care about privacy. You just need to believe that a $300 billion data broker industry doesn't have your best interests at heart, and that spending 15 minutes in your Settings app is a reasonable investment in keeping your personal information personal.
The beautiful thing about iOS is that Apple has actually built robust privacy controls. They're just buried deep enough that most people never find them and are turned on by default in ways that benefit Apple and advertisers more than they benefit you.
Most of the changes in this post take seconds. They break or cost nothing. And once they're done, you never have to think about them again. Your iPhone is the best phone in the world. I just think it should be working for you, not for the data economy. These settings make sure it does.
If you want to see how I've set up my entire iPhone from scratch, covering not just privacy but every setting, every app, every workflow, I put together an 89-page guide that walks through the whole thing step by step.
And if you want to discuss privacy setups, share your own configurations, or just hang out with other Apple users who actually think about this stuff, come join The Useful Tech Club on Discord. You also get exclusive access to my guides and projects and 50% discount on all of my digital products.
Now go open Privacy & Security in your Settings and start turning things off. Your future self will thank you. The data brokers will not.